Monday, March 26, 2012

Monday: My CRAZY Life

Last week was a doozy! Not even sure if that is how you spell that...

Here is a small example of why I call this blog
"My Daily Dose of CRazy...."


That sums up the week.....PReTTy much in that order too....haha...NOT pictured:
Boy with Broken growth plate at the base of his toe. Continued yard work in the beautiful weather...even with broken toes, rusty nails through our feet and a sore arm from a tetanus shot.

And, as a side note: Photo 1 and Photo 6 are directly related!

See you tomorrow with our last Tuesday Tutorial for March!


Wednesday, March 21, 2012

Spring Wreath~Tutorial

I HAVE NO IDEA WHAT HAPPENED YESTERDAY TO MY TUESDAY TUTE!! I somehow managed to NOT publish it???

This Week, I am bringing you my cute Spring wreath! I have never been a big fan of silk flowers or silk flower arrangements...but, lately I have found some very economical and pretty artificial flowers!

I started off with some simple supplies!
*14" Straw wreath form
*20" of Burlap (You don't need anything fancy or higher quality-good ole craft burlap will be best)
*1 Spring flower bunch (at least 5 flowers on it)
*1 (or more) Spring picks I used some of my leftover pieces from the bunny basket to fill in here....
*Glue gun
*Scissors


(DO NOT know why this won't sit properly!)

14" Straw wreath

Start with your wreath...remove the plastic WITHOUT cutting the clear nylon string that holds the straw in place! THIS will create a huge mess in your house! hehe...

NOW: lay your burlap out and cut it into 2" strips. You should end up with 10 strips. 


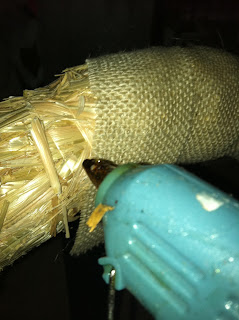
Attach your burlap with a hot glue gun. Wrap the entire wreath. You should have 1 strip left...you will use this for your hanger.


Now, Pop the heads off your flowers. Your going to glue them to your wreath in whatever pattern you choose! Either at the top, the bottom, or off to one side. (this seems to be my go-to placement)


I realized when I was editing the pictures that this little string of burlap was hanging down in ALL of my shots! lol...

Super SIMPLE project! Fail proof! Have fun!!

Friday, March 16, 2012

I will follow

I am waist deep in a creative journey right now! I am following my heart where ever it is leading me! I am on complete OVERLOAD with online classes right now! And, I am LOVING EVERY MINUTE OF IT!

I wish there were more minutes in the day so that I could complete EVERY assignment/project that is shared!

I started off with Love Love Love by Margie Romney Aslett  and Jeanne Olivers Creatively Made. They both inspired me in different and GREAT ways!

I was able to grow my deep seated love of painting and mixed media with Jeanne Oliver's class and I was able to create very quick and full filling projects with Margie's class. Both very necessary processes for me! Sometimes I need to do something really quick - but creative - before digging into bigger creative projects....
This is still in the works...not finished with the heart in the middle...want to add a little more dimension to it...

Remember those cute little (actually mine were pretty BIG) Lollies? Well, I made more for Easter!
Then I signed up for another little set of quickies! Christy Tomlinson's mini workshop and she offered one of her other classes with the purchase of this workshop. Two for one...love!

I don't have any pictures of projects from this class...but I did enjoy it~ just not enough time to finish them all!

NOW...I am taking Terri Brush's class. Hellllllllooooooooo sweet love!!!! I can't believe how excited I am about this class! Ridiculous!!! Feeding the creative Jewelry Designer soul deep inside....so happy!

I am so happy to find myself really embracing this part of my creative self and journey! I will continue to Follow my Creative Heart where ever it leads me! Not going to stop myself anymore!

I am finally learning my Creative Process! Honestly I have to thank Jeanne Oliver for that. Her class really taught me to see how my creative process has led me to where I am today. Can't wait to see where it leads me next!

Go follow your heart today!
Thursday, March 15, 2012

Thrifty Thursday

Man, I LOVE a good Thrift Store!

Not all thrift stores are created equal, and if you have a good one that you frequent, you know what I mean!

I was able to hit my favorite spot twice this past week! It is only open 2 days a week so obviously this was a big deal. hahaha....Our break in weather has brought on my Spring Thrifting Fever!

Day 1: This sweet little pin and these two super sweet pillow cases. I am totally in love with the sweet pink roses!


Day 2: These SUPER cute spectator shoes! This super cute brown wool hat...and a few supplies   


Leather belts, Wool blazers, and busted up old jewelry!   Oh My...

I will be making another trip out today.
I will let you know what I find!
Tuesday, March 13, 2012

Chenille Garland

Time for a Tuesday Tutorial....Sounds like fun to me! As promised, here is another project that I did during my Ladies Craft Night~Spring Edition!

Chenille Garland!


Start off with a package of Chenille Stems. I used a pack of 100 from Michael's. It had the best color combo in it and it was only $2.99. The pack from Joannes only had 4 colors(and was also $2.99) . ...I wanted more!

Take your Chenille stems and cut them into 4" sections using wire cutters. You will end up with 300 pieces! This seems like a lot, but by the time your done it won't seem like it!


Take a stem, and bring it together to form a circle. Twist the ends together and straighten it out a bit to form a nice little circle. If you don't want a real "uniform" look, just leave it a little cockeyed!


Then just start building yourself a chain! I didn't follow any pattern at all. In fact, I was talking to the whole time I was creating this chain so it was completely  random!


I use this little chenille garland in different colors for all different holidays. I was so fortunate to have this little crafty-craft published in Amy Power's Inspired Ideas  magazine Christmas edition! I used a smaller cut for that one...it was super cute and petite!

She has the cutest magazines and the best group of ladies contributing to her magazine! LOVE them!!

I hope you enjoyed this little Spring Craft!
Enjoy!
Tuesday, March 6, 2012

Bunny in a Basket: Tute for You

I hosted a Spring Craft Night at my house this weekend similar to the Valentines day one I did. Super fun!! I loved playing with Sparkly Bunnies and pastel chenille!! I thought I would share a few of the projects with you!

This is a picture of the 3 Projects we did. I am going to post a Tutorial every Tuesday for the next 3 weeks! Hope you enjoy them!


The first Tutorial is for the Bunny Basket! Super cute and really easy - plus inexpensive - to make! My favorite kind of decorative craft! My photo's are just a wee bit "gray" because the sun couldn't decide whether it wanted to stay out for me!

Simple Supply List:
Shred
Wire
2 Spring picks
scrap ribbon
Yarn Spool
Base
I used a lid from a pint container (for ice cream or in my case Coffee...we have a few hundred of these left from when we closed our coffee shop!)
Yarn Spool
a Doily

And some basics:
Glue Gun
Scissors
Wire cutters


I cut the wire at 12" for my handle


I put my little handle in place by poking a hole in either side and made a little loop. Some ladies just glued them in.   

 At This point I also glued my ribbon around the Lip of the lid and glued a doily to the bottom. 

I took my little pick of sparkly eggs and berries and spread them out. Needed to get the most bang for my $1.99 out of this little guy! :)


I cut myself 3 eggs and a small branch.

Here is where my little tutorial went awry....I can't seem to locate the next 4 photos! I am however pretty sure you can figure out what happens next... hehe

Glue your shred into the base
Position and then glue down your bunny and eggs
Position your little sprig of eggs and berries to the wire on the side or all the way around. Be creative!


Here was my final product! I have decided to add a little pennant banner to this one! Enjoy!
Monday, March 5, 2012

Monday: My Life

Do you know another reason why I love my iPhone?? Because it really helps me capture more "Moments" in my every day life that I wouldn't usually be able to get. Ask me how often I pull out my BIG camera....hardly ever.  

Here were just a few moments last week that I will get to savor forever thanks to these pictures.
One of our fluffy pups sharing some space with me..

Walking in and finding Lil' syncing her ipod...all by herself.


Cracking up when I saw this in the bathroom..only in my house


Lily loving her music. The girl will listen and sing all day long...


Craft night set up for the Ladies!


Can't wait to see what this week will bring.